


Sometime in December, I saw a photo on Pinterest that led me to this website where they were selling them for about $45 american dollars. My favorite part of crafting is making the things I see online. There's nothing better than making something for $5 that you could by elsewhere for 10 times the price.
Needed:
- T shirt like fabric (fabric that curls really well when cut. Things like Rayon, or knits) I found both of these fabrics at my local thrift store. Check your thrift stores first!!
- Scissors
- Pins
- Needle and thread to match your fabric, or sewing machine
- Measuring tape
- 2 Ponytail holders
\\ First, measure your fabric and make sure it is 62-72 inches long. Both of my scarves were 62 inches, and they are closer to your neck.
\\ Cut a strip 8-9 inches wide (62-72 inches long) This will be the main part of your scarf. Pull the fabric slightly to make the edges curl. Sew the two ends together to make it an "infinity Scarf"

\\ Now cut three(or however many you want!) other strips three different widths. These will be your braids. I made a small medium and large braid. (Probably 6 inches, 4 inches, and 3 inches wide) Cut each of them into three equal strips, and keep them in separate piles.
\\ Bundle three together and pull each slightly to curl the edges. Tie a ponytail holder around them, and braid. I put the end of mine under a chair leg to try and make the braiding easier. Don't pull too hard or too lose while braiding.
\\ Sew each end of the braid and remove the ponytails. Cut off the excess fabric. Do this for each braid.

Here I have discovered, is the difference between other tutorials and my own. I sew the braids directly onto the "main" scarf so you can fit more braids without the back looking too bulky (here I only have three a piece)
\\ Find the seam of your main scarf and pin your braids right below it. Hand stitch or machine sew them. Make sure they are lined up and facing the same way (as in not twisted, but hanging all the same way), and do the same on the other side of the seam.

\\ Cut a piece of fabric big enough to cover the stitches of your braids. (roughly 3x 6 inches) Pull slightly to curl edges. Fold the fabric on either side of your braids under. Center the fabric on top and pin it. Then flip it over and pin it on the bottom.
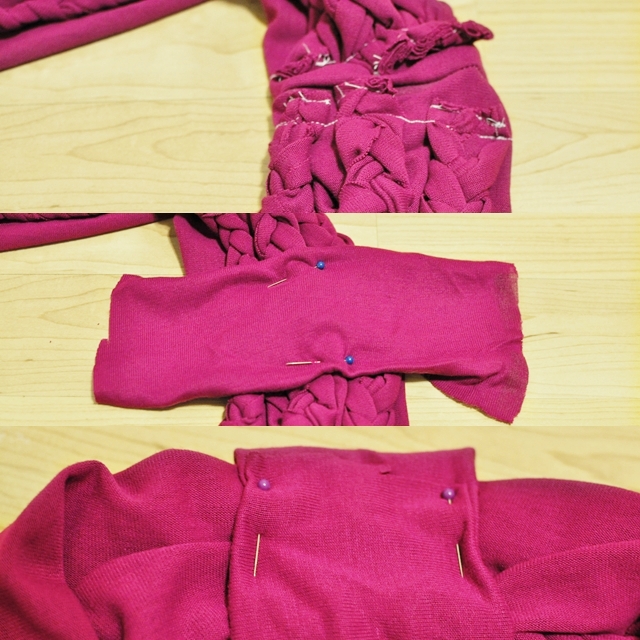
\\ And Finally Hand sew where the fabric ends, making sure you don't sew through the top.


Add a tag?


UPDATE: I had a friend of mine by her material at hobby lobby (2 yds for about $12) Her fabric curled up insanely, so I suggest cutting wider strips if yours does the same!
I would love to see it when you make it!
ReplyDeleteIt really is easy! Trust me, I'm no sewing master. Red is a bloody great Idea!
ReplyDeleteThis scarf looks amazing! Definitely bookmarking, I cannot wait to try this. Thank you for sharing!
ReplyDeleteHannah
thebraidedbandit.blogspot.com
Beautiful DIY! You make it look so easy! I would be bleeding if I attempted this... hey, maybe I could make a red one! Haha Great Post!
ReplyDeleteLove & Lollies... Jessa
Confessions of the Cupcake Countessa
No problem! Happy to spread the scarf love.
ReplyDeleteum....YES, PLEASE! thanks for posting this!
ReplyDeletexo alison