23 May 2013

pet parents mugs DIY

Untitled

Those #1 MOM & DAD mugs always look so lonely at thrift stores. They're number ones of no one anymore. I bought these with intentions of just giving them a home and pretending I was a number one mom and Jeff a number one dad but this was a better idea and we don't have to lie.

needs:
- OIL BASED Sharpie marker (I got mine at Michaels)
- #1 mugs
- An oven that works

Here we go: Preheat the oven to 350 F, spend a good amount of time scribbling CAT or DOG or RAT or FISH, when you mess up (you will mess up) just use a cotton swab and rubbing alcohol to wipe it all away (That giant red one on the mom mug sucked up the marker and made it difficult to wash away, take note of that.) Bake mugs on a cookie sheet or whatever for 30 minutes. Let cool completely.

UntitledUntitled
Untitled
BOOM.

15 May 2012

Photo+wood transfer love

Every mother's day I make something with a "Love" theme for my mama. It started with some decorated hunk of wood I made when I was 10 or so with LOVE spelled out in screws & washers. I even used the drill by myself. I don't know how that worked out. I've also made a collaged flower pot and a love photo frame. My Mom always loves the homemade gifts best, of course (what mother wouldn't?) I love making her something new each year that she can hold onto forever. It's the very least thing I can do to make her smile and remind her that I love her always.
This year I was eager to try out this wood photo transfer from Photojojo and this project seemed perfect.


 In total, this project cost me about $25, and that's without the board. I'm happy with the way it turned out, it looks great in our living room, and my mom loves it, which is the most important. A lot of faces and elbows and bodies were sacrificed during the rubbing away step. It seemed that no mater how light I scrubbed, tears were inevitable.

The tutorial was in no way misleading- I'm sure this really would be easy peasy on a smaller scale. But this was a little chaotic. I have to take into consideration that I had only a small amount of time to finish, and also that the medium I used was a Super heavy Matte Gel Medium, rather than a regular "Matte gel medium". I watered it down, but maybe it still played a roll in this tricky process. However, it still hasn't scared me away! I plan to make many things in the future, with time on my side, and a lot smaller canvas.

Tips & answers:
- Don't go too big for your first attempt unless you have patience, patience, patience. (This board was about a foot tall, and maybe 3 feet wide?)
- I printed 16 laser print photos at Office max for $10 (I was puzzled where to laser print, turns out office max is a win)
- Make sure you let your project sit the full 8 hours
- Don't rub with a rag over faces!!
- Rub with the grain for clean look, against it for distressed look
- When I put my coat of mod podge on, there were still some fuzzies. (a lot in some places) The mod podge made it mostly disappear, keep that in mind before you scrub so hard that your photos come off!

I hope all of you mamas had a wonderful Mother's day.

07 May 2012

DIY Nail Polish Jewelry

Stumbling around the blogosphere Saturday, I came across this jewelry revamp idea at Trampling Ice cream. Which led me to remember this post I liked for keepsake on tumblr. And this nail polish shoe tutorial over at The Dainty Squid. Nail Polish making all the difference since people started using it on anything but nails.
Coincidentally a Rhinestone Brooch came into my possession on Saturday also. I tried it out. I love it. Rhinestone jewelry is now on my "to thrift" list, always.
oh the color combinations

10 April 2012

Tree bark flower pots DIY

Hey guys! I'm back with another DIY. (finally) This craft is definitely what I needed to get my creative fix throughout all of this busyness. Lately I've been all about new plants. A few weeks ago Jeffrey and I went to buy any plant we wanted. I bought a ficus (That told me in was a Bonsai. It is, with a little care) and he bought a bamboo plant. From there it turned into flowers and Aloe Vera plants, and soon to be a lettuce bowl and strawberries. I can't stop.
So naturally I had a billion pots to buy, and high dollar flower pots aren't my thing. So I got a few $2 terracotta pots and started brainstorming. This is what I came up with, and I love it! Please don't be scared away from this DIY because it involves painting. You don't have to be an artist. The tissue paper does all the work for you!

Supplies needed:
- Flower Pot
- Mod Podge
- Different shades of brown acrylic paint (I used 3 colors, 2 lighter and one darker/reddish brown)
- Black acrylic paint
- Brown tissue paper
- Moss (optional)

Tools needed:
- Paintbrushes (For mod podge & paint)
- Scissors

\\ Get a piece of tissue paper ready. Cut it so some will hang off of the top and bottom of the pot ( Or wait until your finished to do this). Paint a thicker coat of Mod Podge on your pot. As you lay your tissue paper over it, use your fingers to crease vertical lines(Like tree bark) Do this a little at a time, and paint a coat of mod podge on top of the tissue paper as you go.
-There will be a lot of tissue overlapping so the paper will fit around the entire pot. This makes it look like bark, so you're doing good. Just make sure your paper covers the entire pot!
- Also, I used a separate sponge brush to wedge under my pot to keep it from moving.

\\ Mod Podge the tissue Paper down over the top and the bottom. Make sure to get the top lip good so it stays water sealed

Painting: Now comes the easy and not scary part!
\\  Once Your Mod Podge is mostly dry, get your paints ready. Paint sections at a time!  Start by paint the creases in the tissue paper black. If some go completely sideways, leave them. Then use the darkest of your brown colors to blend the black into the brown color. Just take your brush with a little paint and rub it down the edges of the black.
It's okay if it gets really dark brown, that's what the lighter colors are for.

\\ Once you've done that all the way around, take a lighter color, or both at the same time, and paint between the black lines. Again, blend it in so it's not just a solid color. Leave some darker, or make them all lighter. Whichever you've prefer!
\\ Once dried, paint with gloss or give it another coat of Mod Podge (gloss) if you want a shiny look. Paint your water dish to match if you have one. I through some floral moss from Walmart around the edge to make it more earthy.
Plant & done!
xo

04 April 2012

Robert Frost Poetry: Journal making

This year I promised myself I'd make more with my hands. Even when all I have is scrap papers, some ribbon, and a paper bag. Then fate happened and I got an English project that forced me into it. You might have caught a glimpse of it in this post.
 I didn't realize how much I miss making these little 'scrapbooks'. Each page is a blank canvas ready for me to glue all over it, and it's so exciting. Everything I used here is 'recycled'. Honestly, I didn't even plan the recycled bag, it worked out well.
 I had to take pictures to illustrate the poems, so that was fun on a whole other level. (Obviously these small things over-excite me)
If your interested in the poems, here they are:
-Two Look at Two
-Nothing Gold Can Stay
-A Prayer in Spring
Happy Wednesday to you all, It's my Friday so you may notice a slightly excited me. 

30 March 2012

Glitter Arrow Earrings DIY

I refrained from titling these "Katniss Inspired" but they are. Inspired by the headband that was Katniss inspired.. so maybe it cancelled out. I was going to share this the day the movie was released, but I decided I'd spread the Hunger Games love out as long as I can. These pretty things cost so little money for the materials, then you can make a dozen or more with what you bought.

Tools needed:
- Hot glue gun
- Scissors
- X-acto knofe
- Ruler

Materials needed: (All can be found at Hobby Lobby, Glitter vinyl is next to the felt)
- Glitter vinyl, or any other material you'd like to use
-  3/16 in round dowels (wooden sticks)
- Wire
- Earring "fish hooks"

\\ Measure your material to the size you would like your earrings to be. Mine were about 2 1/2 in. by 3/4 in.
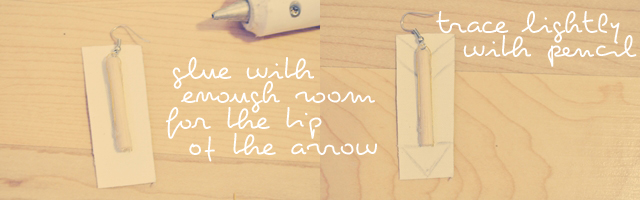
\\ You want your dowels shorter than the material. The tip of the arrow will not have dowel behind it. Use an X-acto knife to "saw" a circle around the dowel. (It wont go all the way through- you just cut a circle then break it in two.) Sand the edges if you'd like.
\\ Cut a piece of wire twice the length of your dowel. (close) Hot glue.
Repeat the process for the other Earring. After the first time, it goes by quicker.
There you have it. That's wasn't so bad.
Happy "It's already 11 o'clock" Friday!

21 March 2012

Hunger Games T-shirt | Freezer Paper Stenciling DIY/Tips

Freezer paper stenciling is awesome. It is made even awesomer by the Hunger Games. This week I made around twenty five of these, and man was it a task. But they're awesome! and kind of punny to anyone who knows the story.
So back to the point: Freezer Paper Stenciling. It's fun and easy and it will made you want to decorate everything you have. Not to mention you can whip up your own Hunger Games shirt in less than an hour to wear after the movie.

Tools needed:
- X-acto knife
- Iron
- Tweezers
- Cardboard, X-acto mat, or slightly squishy surface for easy cutting
- Sponge brush, or other brush

Supplies needed:
- Freezer Paper
- Fabric paint
  - Or acrylic and a Textile medium (Hobby Lobby)

\\ I made my own fabric paint with a textile medium. I used two 8 oz bottles of white paint, and one 8 oz bottle of the medium. Worked great!

1\\ You can either print your design directly to the freezer paper, or trace it. I would have printed if I had the resources. Then again, I made a million of these stencils.
2\\ Cut out your stencil. if you haven't find the secret that X-acto knives cut better on soft surfaces, now is the time to learn. I'm not talking a couch or a pillow. More like a piece of cardboard, or a slightly squishy laptop lap desk. (It's a good investment)
3\\ Center your design. This was a pain in the butt for twenty shirts. I measured from armpit to the first letter on each side to make sure they were even.
4\\ Iron it on. TURN YOUR STEAM OFF. or it will ruin your stencil. Iron slow and on medium heat. Make sure you don't flip a corner and iron it. It has a hard time sticking afterwards.
5\\ Paint. Paint in coats, don't try to lather it up all at once. I used a sponge brush and dabbed so I didn't squeeze the paint under the stencil somehow. I was just extra careful.
6\\ Give it a second coat after about ten minutes. Let it dry completely before peeling off. It's not impossible, but it makes it much easier. If you need it off, just use tweezers on the thin pieces of the stencil or they'll rip.

Here's my stencil print out if you need it:
You can reuse stencils. If they're words like this with many places to rip and stick, it seems impossible. I couldn't reuse one. But simpler stencils work just fine to reuse 2 or 3 times. Or more.. it just depends.
So quick, make yourself a shirt to wear after the midnight showing! And headbands, too.


15 March 2012

Katniss Inspired arrow headband DIY

The Hunger Games movie premiere is so close I can taste it. So I thought it would be a good time to share this arrow headband I've been thinking about since I read them. They're cute for everything, not just Hunger Games Premieres (Although I strongly encourage it)

Tools needed:
- Hot Glue Gun
- Scissors
- Ruler

Supplies needed:
- Glitter vinyl (I'm not really sure if that's what it's called. It's not paper nor foam. I found it next to the felt at Hobby Lobby)
- Thin Headband(s)
- Tape (optional)
- Thin ribbon
The Arrow
1\\ Draw or print out your arrow. I made my own in Photoshop, and you're more than welcome to use it. Print it the full length of the paper and cut it out. (Mine shows I left white, I adjusted the arrow afterwards so you shouldn't have to!) Click the arrow to make it full sized!
2\\ If your arrow isn't about a foot long, cut it in half. Place or tape one half of it close to the edge of the back side of the glitter vinyl. Use your ruler to draw a straight line so you can like the other half up easily on the other side. Once both sides are in place, trace with pencil or whatever you have. Cut it out.

3\\ Have your hot glue gun heating. Play around with your headband and your arrow and mark where you'd like to glue. Make sure you glue right down the center of the arrow.

4\\ Now that your arrow is glued, it's time to wrap the middle. Cut the glitter vinyl on each side where the arrow and the end starts, so only the 'stem' of the arrow will wrap under.

5\\ Hot Glue each side down a little at a time. Wrapping it as far as it will go. Make sure to push it down flat and smooth it out while the glue is still hot.

6\\ For a more clean look, glue a thin piece of ribbon on the inside of the headband.
Voila! Completed! Now where it with Katniss on your mind, or if you're not even sure who she is, read the Hunger Games, or (and!) see it in theatres on March 23rd!

23 February 2012

Glitter your shoes DIY

Didn't think a DIY was comin this month, huh? The lack of them have made me sad. I have all of these ideas but I am unprepared for everything. Or lazy. Something. Tonight I buckled down and used every minute of my after school free time wisely. Here is the product.
I've seen many glitter shoe techniques lately, but this one from Groom Sold Separately seemed most promising. Instead of applying the glue and then glittering over it, with this tutorial, you mix the glitter and Mod Podge together. This makes for extra stick-able glitter that doesn't fall off as easily. Genius!

Needed:
- Mod Podge
- Paint Brush small or large enough to glitter your surface
- Sand paper
- FINE glitter (not your kids crafts glitter)
- Make-up brush (to brush the rest off)
- Bowl

1\\ Sand the area of your shoes you are glittering until it looks a little scuffed up. This is important with the Patent leather shoes, (shiny) but with mine here, it wasn't a big deal.
2\\ Pour you glitter in your bowl first, then add the mod podge. It's something you have to mess around with, but you want a fairly glittered, pasty mixture. Mine is a little dry here. This WILL NOT work with the 'kids' craft glitter, go tiny tiny!
3\\ Get a good amount of glitter/podge on your brush and go to town, REMEMBER: a little goes a long way. SPread it out as far as it can go before getting more to avoid clumps. Also, I found it easier to paint the edges more sharp if I wetted my brush a bit.
4\\ I though this in myself, but use some sort of brush to dust of the excess once your shoes are DRY. This shows you if you need to touch up anywhere rather than waiting for it to fall off later.

Of course, wearing them with dust some glitter off. A little here and there, nothing to bad. If you don't want to have to touch up maybe at some clear paint? A layer of mod podge + water over it?
Happy almost Friday you guys!!