

24 May 2012

Scarf braided crown


heyo guys! Today I'm here to share a little something I've been doing recently with my hair. I usually battle with myself every summer finding ways to keep my hair off of my neck in this crazy humid Missouri weather. This is my new favorite for my long hair. It's a little snazzier than your average milkmaid braid, but just as easy. Just roll with me on this as I call it a scarf braided crown, okay?

 Length: Long hair
Supplies: Bobby pins, scarf
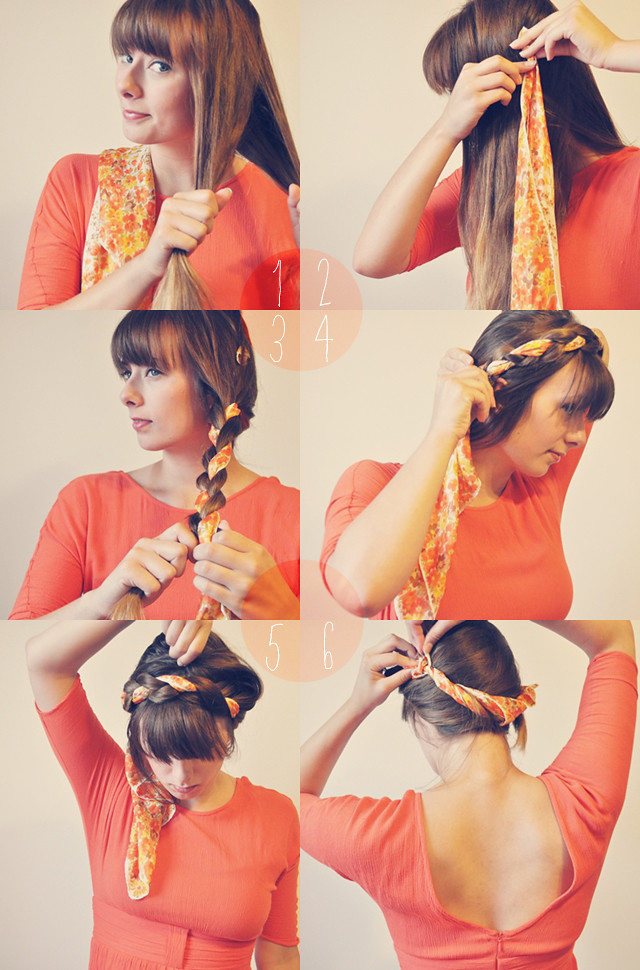
scarf braided crown 1\\ Part hair into two sections on the side you want your crown to start.
2\\ Bobby pin your scarf between the two sections
3\\ Start with the section of hair coming from the back of your head, and braid until you can no more!
4\\ Pull tight and bring over the top of your head. This is a good time to manipulate any stinkin hair that sticks up or poofs up at the start of your crown. Bobby pin it wherever the braid ends.
5\\ Secure your braid with a bobby pin at the top, and anywhere else it feels wiggly.
6\\ Twist or just bring your scarf behind your head, tuck it over the start of the braid on the other side, and pin it.
Some scarves may be too large. Before I give up on a scarf, I try folding it different ways to make it shorter. The larger ones, for instance, work better when you fold them into a skinny rectangle, rather than starting with a triangle fold.
I hope this helps solve your summer hair, too
Have a wonderful day!

scarf braided crown

20 April 2012

No Poo!


You've heard of this right? And you know I'm not talking about number 2? Instead, I'm talking about the No Shampoo Movement. I've known about the harm of shampoos for a while now, I just did nothing about it because I couldn't stand the thought of 'no lather'. Also how it's not healthy to wash everyday. I couldn't imagine that at all, I'm an oily mess.

It wasn't until I got my hair dyed last week that I realized more washes = less dye time. So I started stopped washing my hair for a few days. (This only started Sunday night) This progressed into me researching all kinds of hair health once I realized throwing my hair up for a few days isn't so bad. That's when I found the no poo method using baking soda + water for Shampoo and Apple Cider Vinegar + water for conditioner. Last night was the first night I tried this, after a few days of unwashed/unconditioned hair. Honest, my hair feels wonderful. It felt so clean! Of course I didn't think these basic kitchen ingredients could stand a chance next to what I'm use to. The shine and the softness might be the most surprising, Again I'm struck with the feeling that our modern world is so uninformed that we don't realize that we are the ones doing harm, and stepping away from all of the commercials, rituals, and traditions can even help us. So here I am, recommending this to all of you! Give it a try maybe? Fight the shampoo!

From what I've read, it only gets better from here. For most, after their first no-poo wash, there isn't much change. For some it even gets oilier. I think not washing for a few days made that difference for me, so don't get discouraged if there isn't immediate change! Also, it depends on your ratio. Different lengths get different amounts of baking soda/vinegar. You just have to play around.
I am ordering all natural Shampoo bars, from Chagrin Valley. (Café Moreno) They're pretty cheap & it's likely they will last a while with every-third-day washings. I'm unsure if these will be better/just as good as the baking soda, so I'm going to try it out for myself. I've only read good things, but I'll post progress with that later. I'll be sticking with baking soda for the next week or so.
This is just a brief little summary of everything I'd like to say. Here are a few links to learn more if you're interested.
- one
- two
- three
Happy Friday guys!

03 April 2012

A quick nail inspiration

I'm not usually one to post manicure ideas. This is mostly because I fail at painting my nails. Every. Time. I always have to touch something, or a hair falls on the wet polish, and there's almost always a giant mess including polish remover and cotton balls stuck to a fresh coat... but this. Trust me on this. If this sounds like you, this is a polish you can master. If your a pro (lucky!) I think these are pretty cute anyhow, and quick for those I-want-cute-nails-but-I-only-have-20-minutes occasions. While I'm still doing introductions, I want to draw your attention to this lovely lady, who has inspired me to start doing fun things with my nails. Check her out.

Choose any nail color(s) you want. I chose five different colors here.

Before I give you the few simple steps, it's probably important to explain what your about to do. The thing that makes this easy for my clumsy, inpatient self is the fact that there is no bottom coat. So that means, no waiting forever for your nails to be dry if your short on time. This way it's easy to paint, and touch up through long wears.

\\ Cut yourself 10 strips of tape. You can use scotch tape.. I only had painter's tape around, and it worked perfectly.
\\ Line the tape up so you will be painting the entire white of your nail, angled downwards. It is a little more than half, or half on smaller nails.
\\ Double check your tape so you have a clean line. Paint two coats. You can wait for your nails to dry, or you can take them off carefully after your second coat. I like to take them off right afterwards pulling the tape towards the paint.
\\ Clear coat!
Also, you can make both hands slanting the same way, or do opposites like I did here. Or just play around with this idea until you have the patience to let your nails dry?
Send me photos if you do! I'm always looking for cute things to do to my nails.


28 February 2012

A charming loose braid how to


It's the braid that's charming, not me explain how to. Sorry for the let down. I'm going to do my very best to explain a braid my fingers discovered the other day. I think it'll be a lot of me trying to put my brain words into common sense. Stay with me here, because this braid is lovely. I'm not a master braider, either. I can only french braid on myself, and it's nothing to brag about. This just takes a little patience and loose fingers (what?) I'm trying to keep in mind that some don't know how to french braid, but I'm sorry if this is harder to understand! Oh by the way, this is my Friend Shelby Miller!

1\\ Grab a pony, and brush your hair smooth. Comb all of your hair back, or try to part it closer to the middle.
2\\ Grab your starting strands. One on each side and one right in the middle, all the same size. Don't grab a big clump of hair, only a layer or so. This is the technique you'll use through the braid, so I'll explain in more depth. Shelby had a hard time clearly showing all of them at once, so we took separate pictures.

3\\ Braid the strands two times loosely (over one, over again) and take another piece from the front of your hair, add it to your strand, and braid. Add a little with each strand. Like you would a french braid, but without taking back all of the hair. Take the outermost hair! It is important to KEEP IT LOOSE! This is what makes the pretty V shape.
Essentially, your braiding on top of all of your hair. You'll be able to pull it up as you go and see your hair underneath. The arrows are pointing to where you will grab hair all the way down. Unlike a french braid, you should be adding hair almost clear to the end of your braid. It's what gives it that loose, soft feeling. The back of your braid should be straight, unbraided hair nearly to the end.

And if your starting to question if this is really that different from a french braid, here is the visual:
I hope you can figure this out. Feel free to ask questions, I'll respond as soon as I can!

06 January 2012

(Pretty) Easy Up-Do


Did ya catch that? Pretty easy? I know I say this a lot, but this is too easy not to try. It takes me less than five minutes and always saves me from a bad hair day. This pretty-do accidentally happened a few years ago when I was trying pull my ponytail through to make that cute twisty ponytail. (you know the one?) However, that was before I thought it was cool. It wasn't until last year at some point that I started doing it for reals for reals. Wanna try?

Needed:
1 pony tail
2 bobby pins or those new twisty bobby pins
Hairsprays (optional)

\\ Probably brush your hair or something so it doesn't look like mine. Low ponytail it!

\\ Make a 'hole' at the top of your ponytail by pulling two sections of hair apart. Do not make it all the way through your hair, leave the bottom alone.

\\ Twist your ponytail and stuff your hair into the hole you made. By stuff, I mean.. Stuff it neatly into the hole so your hairstyle wont be lopsided when you're finished. Kind of like the way you'd make an ice cream cone.. sort of. If there are any lose hairs, go ahead and really stuff them in.

\\ Now add a bobby pin going each way through the top, through the ponytail holder. (which should now be right at the top of your stuffed bundle)
 Voila! Nows the time tuck in any little hair that escaped, and hairspray.

Do not get discouraged if yours turns out like this. (below)
I still do it sometimes! It's usually because my ponytail is too loose. Just take it out and try again.
Also add a headband or a headscarf for a little cuteness. I love it either way, but no headband is usually my more casual look. Oh hey, and when you take this out, your hair will be all nice and wavy.
There is nothing more annoying than a hair tutorial that makes no sense. Believe me, I've been there. Getting ready for some kind of event telling(yelling at?) the computer "that doesn't make sense!" "It doesn't look like that at all!" Then ending up leaving it down and in tangles. Oh I'm the only one who does that? Anyways, if something doesn't make sense, let me know! Really.
Happy Friday everyone!


29 March 2011

Scarf+braid DIY

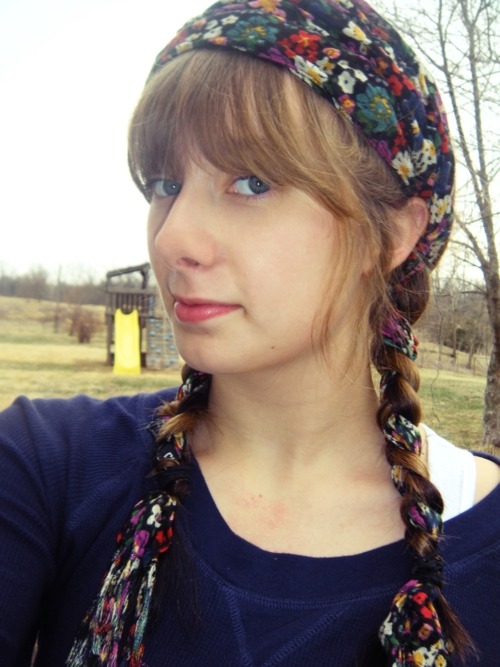
So, I don’t usually post hair DIYs, mostly because I don’t know any. My hair is usually just plain old straight and down, or in the side braid. Last week at some point, I came up with another idea.. and I don’t have a name for it. It probably is already an idea out there, but hey, don’t rain on my parade. I was feeling pretty proud of this.
 
Well pretty simply I braided a scarf into my hair. If you like this, I’m here to show you how in… 6 easy steps! woo! I am awkward in photos, bear with me. I’m not sure how this would work with short hair. I have pretty long hair. But I guess you’d just need a shorter scarf? But here's a few steps/tips along the way.


1) Grab scarf, fold evenly in half. 
2) Wrap around your head, with the two ends of your folded scarf at the back of your head. Pull through loop.
3) Pull tight, and line it up in the middle of your neck. 
4) Part
5&6) braid & ponytail it